
This tip of the week comes from guest blogger and Nashville photographer Sean McLellan of McLellan Style.
You rush home from your first shoot, excited to download and look at all the images. You sit down at your computer, pop the cards into the card reader, create a folder called “Jim and Beth” and start downloading.
No big deal, right?
Fast forward a year later and your folders have different names. Some have names first, some have dates first. Some have some sort of clever numbering system you thought you’d use. Somewhere along the line you ran out of hard drive space and got an external drive and started downloading things to it. Then you consolidated things a few months after that and now you’ve got two or three copies of some sessions and you aren’t sure which one is the newest one.
The phone rings. “Hey, this is Beth—Jim and I got married last year and would like a canvas for our new house! Can I order that?”
Uh oh. What was their folder name again? And where the heck did you save it? Let’s save all that headache by setting up an easy to use and powerful organizational structure.
First, let’s talk hard drives.
- Hard drive #1: Operating system + Applications
I always use one hard drive that ONLY has the operating system and programs installed on it. For real. OSX + installed software and that’s it. (Or Windows…I hear rumors that some photographers still use that?) - Hard drive #2: Work in progress
We abbreviate this drive as “WIP.” Every shoot you are currently working on goes here and nothing else. Mine is a 3TB internal drive on my Mac Pro tower. My wife uses a 3TB external drive plugged into her iMac. We’ll come back to this one; all the important stuff happens here. - Hard drive #3: Archive
This is an external drive where we archive - Hard drive #4: Backup / Time machine
We use Time Machine (OSX only) to automatically create a backup of everything that goes on the WIP drive, so as soon as we download cards, as soon as we change any Lightroom settings, as soon as an image is retouched, etc., it’s immediately backed up in case of hard drive failure. - Hard drive #5, 6, 7, whatever: Extra hard drives. Not important for anything we’re talking about…this is where you put all of your other stuff, whatever that may be.
Next, how to use a WIP.
When creating a folder for a shoot, we use the date first, then the client name, then what type of session it is:
YYMMDD – Amanda and Cary – Wedding
Here’s a screen shot of the inside of my WIP drive right now:
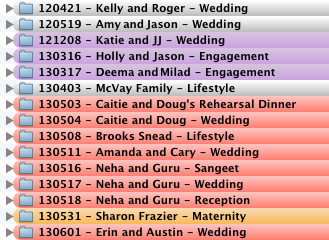
Whoa, my folders are all colorful! Yeah, let’s talk about that.
Mac users – you’re probably familiar with this, as it’s been built into OSX for years. Windows users, unless something has changed and this is now built into Windows 7 or 8, you’ll need to download some software to add this functionality.
This is just a quick way for me to tell where I am with my current work without having to do anything but glance inside the WIP drive. Using OSX, just open up Finder and Finder > Preferences and you’ll be able to open up the Labels tab and give meaning to the colors.
Here’s a shot of what our colors represent:

- Red: In progress. These are jobs that we are still working on.
- Orange & Yellow: Haven’t thought of a use for these, yet. Any ideas? Leave a comment below and let me know what wonderful idea you have that I am missing out on.
- Green: Need to order. This is an order I need to place for a client (print, album, etc.). Green as in, order this because you just got paid for it. See what I did there?
- Blue: Ready for Premiere. This means everything is wrapped up and we’re ready to share everything with our client.
- Purple: Waiting on Client. Could use this for any number of reasons…maybe everything is finished and the client has ordered an album, but we’re waiting on them to approve changes using Album Proofer.
- Grey: Ready to archive. This means everything is wrapped up and it’s ready to be moved to the archive drive. Occasionally I’ll be waiting on a client long enough that I move a “waiting on client” folder to the archive drive as well.
All right, let’s take a look inside a client folder:

- 9×12 Album – this contains layered PSD album files, and sub-folders with flattened JPGs that are used for album proofing and (eventually) printing.
- Audio – Sometimes we record audio of the speeches and vows for use in a fusion slideshow. If we do that, audio files are downloaded into here.
- Cinema – Sometimes we record a little bit of video throughout the day for use in a fusion slideshow. If we do that, video files are downloaded into here.
- Discs – These are the layered PSD files of the DVD face that we print on the disc we deliver. This is changing as we deliver more and more sessions online electronically or on removable thumb drives, but we still get enough requests for DVDs for family members that this folder often finds itself in our client folder.
- JPEG – These are all the finished JPEG images from the session.
- LR Catalog – This is the Lightroom catalog for the session. We create a separate Lightroom catalog for every single session.
- Montage – These are the files used to create the final slideshow, whether it’s just images, fusion, etc. The finished video file also goes here.
- Premiere – This is where everything goes that we need for the Premiere. If we’re having clients into our studio, we usually have a custom graphic from their wedding with their names as the background of our screen when they walk in the door, and we load all of the video files into a Keynote presentation (that’s Powerpoint, PC people) so that everything flows well when we share things for the first time.
- RAW Files – These are all the RAW files. There’s a subfolder in here called “RAW Keep,” which is all the files that will eventually turn into the culled/edited JPEG images that we actually deliver.
- Teaser – We send our clients some teaser images in between the shoot and when the premiere happens. Those images go in here.
- Get creative – If there’s something else you do, create your own folders and put them in here. These aren’t all the folders we use – depending on the session we may have different folders for different clients, but you get the idea.

Ok, I’m finished with a session…now what?
Great. Now we copy the finished JPEGs onto another hard drive so we have access to the finished images from every session we’ve ever done without having to search through old hard drives. This makes Fundy’s Image Finder much more effective, because it can’t find an image that’s not currently on your computer.
Next, I move the entire client folder to the archive hard drive. We keep archiving sessions to the drive until the drive is full. Then I do a screen capture of the folder showing all of the sessions that are contained on the archive drive and print it…and I tape that list to the top of the hard drive so I can see what everything is at a glance without having to plug it in.
It’s great because all of the files associated with each individual shoot are located in the same place… so if we ever have to go back and do a print order, order an album duplicate or replacement, find an old slideshow or an old fusion piece, or
make another DVD copy, etc., it’s all super easy to find and access.
Here’s a quick glance at sessions from three years ago. They’re organized nicely, ready for me to grab quickly.

And there you have it. Now you can spend more time sipping on your drink on the beach (because I heard a rumor that that’s what photographers do when they aren’t shooting, right?), and less time trying to track down files and folders for your clients. I hope you find this method helpful for your own workflow!
Sean McLellan and his wife, Mel, are the Nashville-based wedding photographers behind McLellan Style. Their work has been featured by In Style: Celebrity Weddings, MSNBC: The Today Show, and other national media. In 2010, McLellan Style was recognized by the Adorama Learning Center in NYC as one of 10 top inspirational wedding photographers in the industry today.


